What it does
The Design tab on a project holds the candidate solutions you are evaluating — a vendor's proposal, another vendor's, or building it yourself — and the architecture views that describe each one.
Keeping them as separate candidates rather than one pile of drawings is the point: each is worked, drawn and later judged on its own, so choosing between them is something you can actually do rather than something you argue about from memory.
How to use it
Candidates
Add one candidate per option on the table. Give it the supplier's name, or leave that blank if the option is to build it yourself.
Each candidate card shows which levels have been drawn — a row of L0 to L4 chips, filled where a view exists and outlined where it does not. That row is usually the fastest answer to the real question when a supplier says their proposal is ready: how far has it actually been worked?
Views and levels
Open a candidate and you get its views rail, one group per level:
| Level | What it shows |
|---|---|
| L0 — Business context | Who is served, which capabilities and parties are involved |
| L1 — System context | The solution as one box and its neighbours |
| L2 — Building blocks | The major deployable or contracted blocks — where most vendor conversation happens |
| L3 — Components | Inside one block |
| L4 — Deployment | Where it runs, including security zones |
| Supplementary | Data flows, sequences — a view rather than a level |
Add next to a level creates a diagram and opens it in the editor. Each view is an ordinary cajeX diagram, so everything the editor already does — versions, the assistant, the shape libraries — works here too.
Elements
The Elements panel lists what cajeX knows about the shapes in a candidate's drawings. It is rebuilt from the drawings themselves every time one is saved, so it can never drift from what is on the canvas — the diagram is the source of truth, and this is an index of it.
A shape becomes an element when you link a requirement to it or drill into it, not merely by existing. A scratch diagram stays out of the index entirely.
Linking requirements to shapes
Open a view and turn on Requirements in the editor toolbar. Select a shape on the canvas and the panel shows what that shape satisfies, and lets you link anything that is not linked to it yet — or write a new requirement straight from the shape.
Linking gives the shape an identity in the drawing, so the link survives the shape being moved, restyled, renamed or re-parented. It is written into the diagram, which means you have to save: the change is applied to your canvas and left unsaved, exactly like any other edit, and nothing about your drawing changes behind your back. Saving is also what rebuilds the Elements index.
Most shapes start untracked, and that is normal — a shape becomes tracked the first time you link a requirement to it.
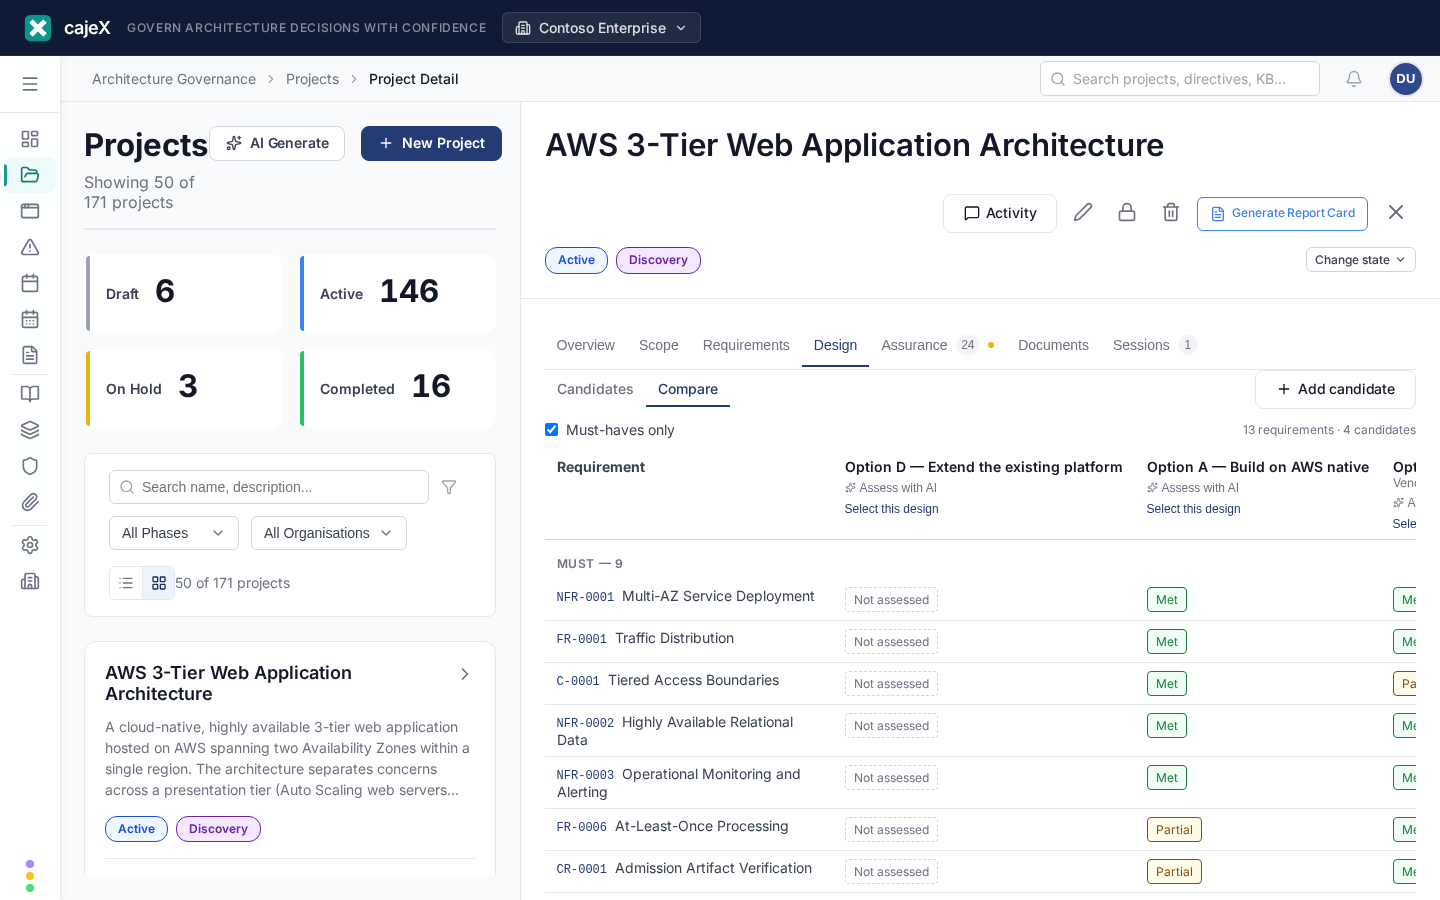
Comparing candidates
Compare puts your requirements down the side and your candidates across the top. Each cell is a verdict — Met, Partial, Not met, N/A — and you set it in place: judging a proposal is the work, and making you leave the comparison to record what you just concluded would be the wrong shape.
A Partial or Not met verdict asks what is missing. It is a small friction on purpose: the value of the verdict is knowing why, and by the time a supplier asks, whoever judged it will not remember.
Three summary rows sit at the foot, and two of them are deliberately kept out of the score:
- Must-haves met — the headline.
- Must-haves not yet judged — because a candidate can look strong on what has been examined while half the set has never been considered. A score over an unexamined set is not a strong candidate.
- Policy-derived requirements unmet — requirements that came from your own directives. Missing one of those is a different kind of failure from missing a preference: it is the one that cannot be negotiated away, so it never disappears into the bar.
A requirement nobody has judged shows as Not assessed in a dashed outline rather than a colour, because it is an absence rather than a fourth verdict.
Selecting a design
Select this design turns a candidate into the decision. Before it fires, the confirm states exactly what will happen, built from the same plan the server will execute — a dialog that promises consequences the backend would not produce is worse than no dialog at all.
Three things follow:
- The other candidates are rejected. A design that was selected before becomes superseded, not rejected — it was the right answer once, and flattening that erases the history the record depends on. You can always choose differently later; the button reads Select instead.
- A draft ADR is written, on the application named in the dialog, and left in
proposedfor you to complete and accept. cajeX writes the record; it does not sign it. If the project has several applications you are asked which one owns the decision, because that is not something cajeX should guess. If the project has no application yet — normal when you are choosing a supplier before building anything — no ADR is drafted, the dialog says so, and your note is kept on the design so the record can be written from it later. - Every unmet must-have opens a finding. Choosing a candidate that misses a requirement is a legitimate decision; forgetting that you did is not. Requirements derived from your own directives open as nonconformities; the rest as risks. A must-have nobody assessed opens one too, and says it was never assessed rather than implying it failed — silence is not a pass.
The reason you type becomes the Decision section of the ADR. It is required, and it is the one moment when the reason is still in someone's head.
Markers on the canvas
Requirements can be drawn on the diagram itself. Refresh markers in the editor's Requirements panel paints a chip beside every shape a requirement is linked to, labelled with the ref and coloured by that requirement's verdict for the candidate you are viewing — the same requirement is a different colour on a different candidate, which is the whole reason to draw them rather than read them in a table. Not assessed stays quiet and dashed, as it does in the comparison.
The chips live on their own draw.io layer, cajeX · Requirements, and cajeX owns it:
- They are rebuilt, never merged. Move a chip, delete one, rearrange them — the next refresh puts everything back from your links. Nothing you drew is ever touched.
- Hiding the layer gives you the clean drawing, which is what a supplier should receive. Use Hide layer; the chips are not deleted, and Show layer brings them back.
- They are invisible to the model. The element index and AI review both skip them, so cajeX never reads its own annotations as architecture.
Once a drawing has the layer, linking or unlinking a requirement keeps the chips in step automatically. Before that, nothing appears until you ask — a drawing nobody chose to mark stays unmarked.
A chip is placed from the drawing in front of you, not from the last save, so a shape you have just drawn and linked gets its marker straight away. If a link points at a shape that is no longer on the view, the panel says so rather than dropping a chip somewhere arbitrary.
Markers are applied to the canvas unsaved, like linking itself. Save the diagram to keep them.
Assessing a candidate with AI
Assess with AI in a candidate's column asks a model to propose a verdict for each open requirement. Everything it produces is a proposal: verdicts land marked ·ai in the matrix and stay that way until you confirm them by editing the cell.
Three rules keep a machine verdict safe to put in front of someone choosing a supplier:
- Your own judgements are never overwritten. If you have already assessed a requirement for this candidate, the model's opinion is discarded and yours stands. The result tells you how many were left alone.
- Every proposal must say why. A verdict that arrives without a reason is thrown away. This is deliberately stricter than the rule you face — you are accountable for a bare "Met", a model is not, and a verdict nobody can check is worse than none.
- "The design does not say" is a real answer, and it is not written down. Where the design material is silent, nothing is recorded and the count is reported instead. Recording silence as Not met would hold a supplier responsible for a gap in your evidence.
The result also tells you how many proposals were discarded — for arriving without a reason, or for naming a requirement that does not exist. That number is shown rather than absorbed, because how often a model misses is something you should be able to see.
The model is given the candidate's summary and supplier plus the labelled elements on its views. A candidate with no drawings can still be assessed on its summary, and the model is told plainly that no views exist rather than left to assume.
The vendor pack
Vendor pack on the Requirements tab produces a PDF of the requirement set — the document that starts the supplier conversation. Requirements are grouped by priority, each with its statement, acceptance criteria and how it will be verified, and the ones derived from your own directives are marked non-negotiable so a supplier knows before they price the work.
Out of scope requirements are included on purpose: telling a supplier what not to build is worth as much as telling them what to.
A pack never carries one candidate's information to another. The document can include at most one candidate's architecture — the one you choose to share — and it never contains verdicts, assessment notes, decision notes, or any other candidate. There is deliberately no "include the comparison" option: a pack reaching Vendor X with Vendor Y's design, or with a note reading "they could not commit to the audit trail", is a commercial leak, so the export is built so that cannot happen rather than relying on remembering.
Drawings are not embedded in the PDF. Where a candidate is included, each of its views is listed with its level and the elements it contains, and the pack says plainly that the drawings travel as separate files.
Asking the assistant about a candidate
Open a candidate and the assistant can see how it scored. "Where are its biggest gaps?" names the must-haves it does not meet, with the reason recorded against each — not a count of green and red. It will also tell you how many of those verdicts are still AI-suggested and waiting for someone to confirm them.
Across the workspace, without anything open, you can ask "which candidate has the fewest gaps?" and get an answer covering every project.
The assistant cannot select a candidate for you. Selecting one drafts an ADR and supersedes the alternatives — a decision with your name on it, so it stays a deliberate act here rather than something you confirm in a chat panel.
Proving it — tests and verification
Every candidate is judged on paper until somebody proves it. Tests, verification state, protocol packs and the failed-test-becomes-a-finding loop all live in their own chapter — see Tests and verification.
The part that belongs here: once a candidate is selected, its architecture plus the requirement set is what the protocol generator works from. Generating protocols before a selection has nothing to generate against.
Handing the architecture over
A project is a change, and it ends. The application is what you still run on Monday — and the drawings that describe it should not die with the change that produced them.
Once a design is selected, the Design tab offers Promote. It moves the selected design and its views to the application the project delivers, and the application grows a Design tab of its own carrying that architecture.
Three things about how it behaves:
- It moves, it does not copy. Two copies of one architecture drift the moment either is edited, and then nobody knows which one the running system matches. The design remembers which project it came from, so it can always be traced back.
- Only the selected design moves. The rejected candidates stay on the project, where they are the record of how the decision was made. Moving them to the application would clutter the operational view with options nobody chose.
- It refuses to silently replace a live architecture. If the application already carries a selected design, promotion stops and says so — superseding the architecture somebody is running is a decision to take deliberately, not a side effect of closing a project. It also refuses an application the project does not actually deliver.
The Design tab on an application works exactly as it does on a project: candidates, views, comparison and assessment. That is deliberate — an application's architecture evolves too, and the next change starts from what is already there.
The protocol pack
Protocol pack on the Assurance tab produces a PDF of the tests a supplier must pass, grouped IQ / OQ / PQ, each with what it verifies, how it is carried out, what result is expected, and a line to record the outcome.
Only tests marked ready travel. Everything AI drafts lands as a draft, and a draft is a test nobody has reviewed — sending one to a supplier who will be held to it is exactly the mistake the status exists to prevent. Open a test and use Mark ready when you have read it. If nothing is ready, the pack tells you how many drafts are waiting rather than shipping unreviewed work.
Tests written by hand carry no stage; they appear under Other verification rather than being dropped, because they are still part of what the supplier must pass.
What the pack is not. It is a grouped test pack, not a controlled validation protocol. There are no approval signatures, no locked protocol versions, no deviation log and no execution record — that apparatus belongs to a validation execution platform, and half-implementing it would be worse than leaving it out, because it would look like compliance. cajeX's job here is the traceability that feeds your validation system: every test says which requirement it proves, and the pack carries that through.
The standing-requirements baseline
When a project touches an application that already carries requirements, they appear at the top of the project's Requirements tab: "N standing requirements on the application this project touches."
These are the requirements that survived a previous handover — what must stay true whichever project touches the application next. Before this panel existed they sat on the application and nobody read them when the next project started, which made handover a filing action rather than a governance one.
They are shown, not copied. The project does not own them and cannot edit them here. Copying would duplicate the text and let the two versions drift, and then nobody knows which one the application is actually held to. The panel is deliberately quieter than the project's own list, because it is the ground the project stands on rather than work it owns — but this project must not break them.
Requirements already rejected or superseded on the application do not appear: they are history, not a standing constraint.
Saying what a shape is
A box labelled "Payments" is a word on a canvas. Selecting it in the editor and choosing an application under This element is makes it the Payments application — bound to the record, not the label.
Binding also gives the shape an identity if it does not have one yet, because cajeX only reads shapes that carry one; binding an untracked shape would otherwise set something nothing ever looks at. Like linking, the change is applied to the canvas unsaved — save the diagram to keep it.
Once bound, the application's Conformance tab counts how many elements of its architecture are bound to real records, and marks an ungoverned one as an application — because a registered application with nothing said about it is a different kind of gap from an unnamed box.
External-system stubs are not offered: they are ungoverned references by definition.
Changing a requirement after it is agreed
Up to Agreed, a requirement is being drafted — edit it freely.
From Agreed onward it is different: its wording has been shipped in a vendor pack, and a supplier may have priced against it. So changing the title, statement, acceptance criteria or priority asks why, and records a version. The reason is the point — a change to something somebody has been held to, with no explanation, is the gap this exists to close.
Changed since agreed at the foot of the requirement shows each version: the reason first, then only the fields that actually changed, before and after. A version that repeated every field would be a wall of text you have to diff by eye.
Fields a supplier is not held to — owner, tags, allocation — change without ceremony.
The ref never changes. It is an identity, and it has already been quoted elsewhere. A requirement that needs to become a genuinely different obligation is superseded, and the replacement gets a new ref.
Test cycles
A result can carry a cycle — a free-text name for the round it belongs to, like "UAT round 2". The field offers what you have already used, because the one thing free text gets badly wrong is drift: UAT round 2 and UAT Round 2 becoming two rounds nobody can reconcile. The cycle you last typed is kept for the next result, since recording a round of tests one after another is the normal case.
Result history groups under its cycle, so a re-run under a new round reads as a new round rather than another line in one long list.
There is deliberately no "test cycle" entity with its own status and scope. cajeX is not where validation is executed — it is where the traceability that feeds your validation system lives.
Availability
Designs are off by default, and need Diagrams switched on as well — a design is a set of architecture views. A workspace owner or admin enables both in Settings → Features.