This chapter covers everything in the Settings area that a workspace admin can do. Owners can do all of this and the items in the next chapter; reviewers and members can see most of these tabs in read-only form.
Settings is the workspace itself: who is in it, how they sign in, billing, features, AI, security and export. How governance runs lives in Admin: expert roles, assignment rules, categories, calendar, notifications, audit — and, since October 2026, Frameworks and Terminology, which used to be Settings tabs.
Permission badge convention
- (Admin) — Admins and Owners can change this; everyone else can view.
- (Admin only) — Admins and Owners can change and view; lower roles can't see the tab.
- (Owner only) — Reserved for the Owner. Covered in the next chapter.
Members

What it does (Admin)
The Members tab is your workspace's roster: who's in, what role they have, who's pending acceptance of an invitation, and (for Entra ID-synced workspaces) who arrived via group sync vs. who was overridden manually.
How to use it
Inviting a new member
- Click Invite member.
- Enter the email address.
- Pick the role (Member, Reviewer, Admin). Owner can only be assigned via transfer ownership.
- Optionally add a personal message.
- Send. The invitee gets an email with a token-based link valid for 7 days.
If the invite expires before they accept, send a new one — old tokens are revoked automatically.
Bulk inviting
For larger onboarding (e.g. an offshore team joining), use Bulk invite:
- Upload a CSV with columns
email, role, optional_message. - cajeX validates the file and shows you any rows with errors.
- Click Send all. Invites go out as a batch job; you'll see status counts as they process.
Managing existing members
For each member:
- Change role — promote/demote within the roles you have permission for.
- Override role (Entra-synced workspaces only) — if a member was JIT-provisioned via Entra group sync, their role normally comes from the group mapping. Use Role override to set a manual role with a reason that overrides the group mapping until cleared.
- Revoke — removes the member from the workspace (their account remains; they just can't access this workspace).
Pending invitations
Pending invites show separately with a Resend and Revoke button on each. Revoking burns the token immediately.
Tips
- Use the lowest role that does the job. It's much easier to promote later than to convince someone to accept a demotion.
- Bulk invite CSVs are forgiving about extra columns; you can paste from a spreadsheet without trimming.
Branding

What it does (Admin)
Customise how cajeX looks for your workspace: upload your logo, pick your primary and accent colours, and preview the result live before saving. Branding applies to every member of the workspace and to PDF exports of Reports.
How to use it
- Upload a logo (PNG or SVG, max 2 MB). cajeX scales it to fit the header.
- Pick a primary colour — used for buttons, highlights, and links.
- Pick an accent colour — used for status badges and chart highlights.
- The live preview pane shows a workspace mock-up with your changes.
- Save. Changes propagate within a few seconds.
Tips
- High-contrast colour combinations work best. Pastel-on-pastel makes status badges hard to read.
- If you have a Custom Hostname set up (Enterprise plan), branding extends to your subdomain too.
- Reverting to defaults is one click — your previous branding is kept and can be restored within 30 days.
Security
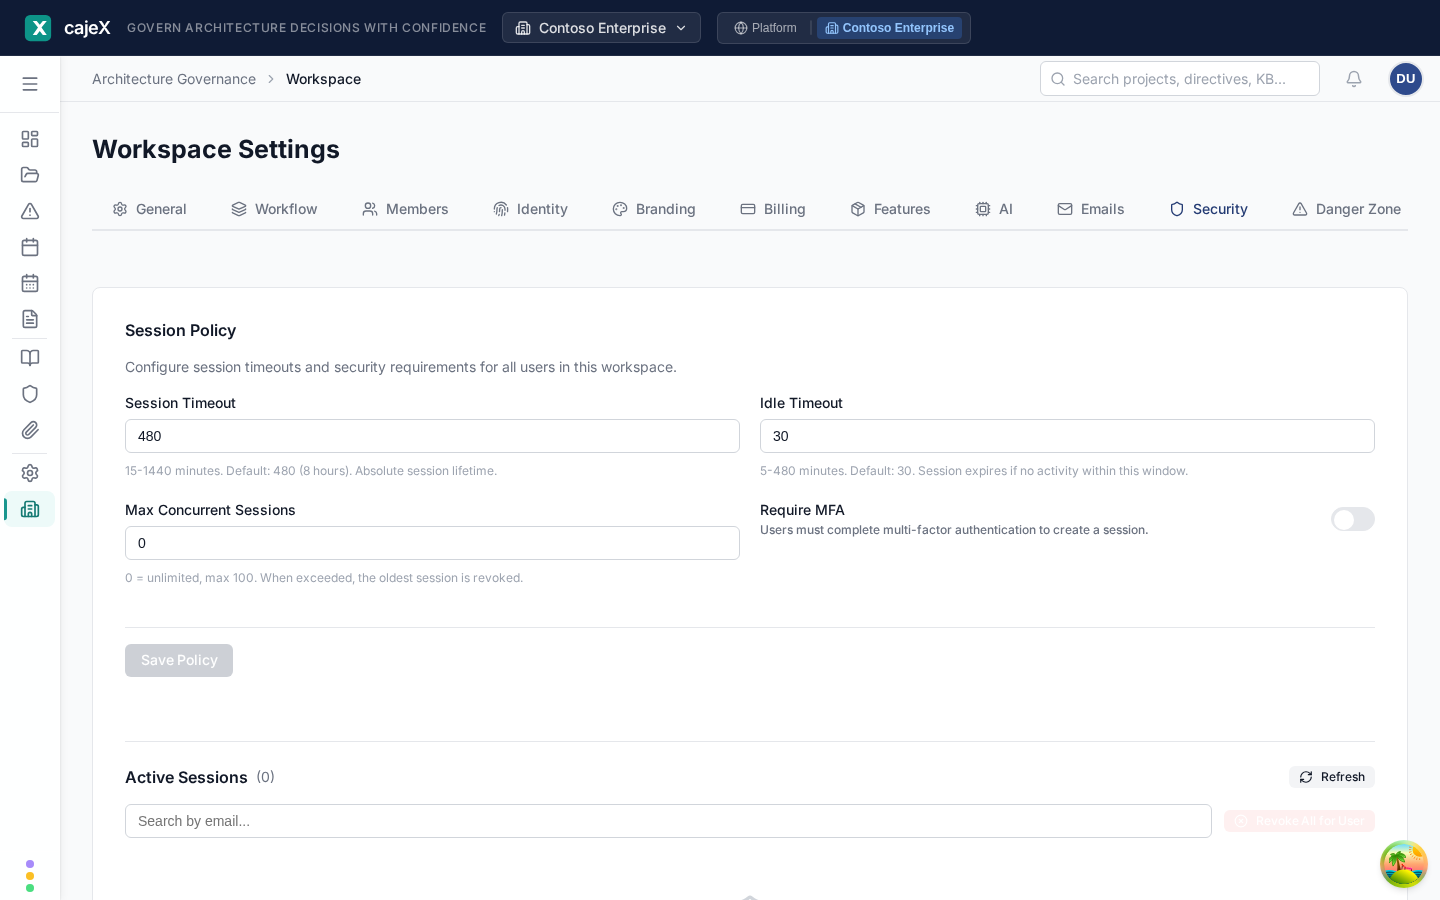
What it does (Admin only for changes; visible to all)
Defines the workspace's session and authentication policy, and shows every active session across the workspace.
How to use it
Session policy
- Session timeout — how long a sign-in stays valid (default 24h, configurable).
- Idle timeout — how long an inactive session stays valid before forced re-auth (default 1h).
- Max concurrent sessions per user — useful for shared machines / contractor accounts.
- MFA requirement — off / optional / required. Required forces every member to set up MFA at next login; non-compliant accounts are blocked from sensitive surfaces.
Active sessions
Lists every signed-in session in the workspace: user, device, IP, location, last activity. Click Revoke on any session to force a logout. Use Revoke all as the nuclear option (e.g. you've just rotated a leaked token).
Tips
- Tighten idle timeout before tightening session timeout. Idle timeout has the most impact on real risk; absolute session timeout mostly inconveniences active users.
- The active sessions panel is the fastest way to investigate "is this user still on the system?" during an incident.
Billing (view)

What it does (visible to admins; plan changes are Owner-only)
The Billing tab is where you see what plan you're on, what features that plan includes, your seat usage, and your invoice history.
Admins can see everything on this tab and trigger upgrade flows, but the actual plan change is gated to the Owner — see the next chapter. Stripe payment authority belongs to the Owner only.
How to use it
- Current plan — the plan you're on, with the per-seat price and the renewal date.
- Seat usage — how many seats are consumed vs. plan allowance. If you're over, the next renewal will adjust.
- Plan tiers table — Free, Basic, Pro, Team, Enterprise. Each row shows what changes between tiers (active members, AI review quota, advanced identity options, etc.).
- Invoice history — every invoice with date, amount, and a download link to the PDF.
Tips
- Watch seat usage before hitting your cap, not after. Pending invitations don't count against the cap; accepted ones do.
- If you have a question about a specific invoice, the PDF download is what you want — it's the document Stripe will reference.
AI settings (view)
What it does (Admin)
Configures how the AI Co-Worker behaves for this workspace: which model is the default, whether you're using a Bring-Your-Own-Model API key, and what your AI usage looks like.
How to use it
- Default model — Claude (Anthropic) on the platform default. OpenAI / Gemini coming soon.
- Bring Your Own Model — paste your own API key. Stored encrypted at rest with a per-workspace AES-GCM-256 key. You can rotate or revoke at any time.
- Quotas — how many AI reviews per day / per month based on your plan. Visible to all members.
- Usage dashboard — token usage, review count, and cost broken down by model, task, and day. Every member can see this.
Tips
- BYOM is most useful when you have an enterprise contract with the AI provider and want the spend to flow through that contract. For most teams, the platform default is simpler and more cost-effective.
- Set quotas based on your plan tier and your team's actual review cadence. Setting them too tight blocks legitimate work; too loose makes runaway costs invisible.
Identity (Admin only)
What it does
Connect your workspace to an enterprise identity provider:
- Social login — toggle Google / GitHub / Apple on or off.
- Magic link — toggle on or off.
- Enterprise SSO (paid plans) — OIDC, SAML, or Microsoft Entra ID native.
- SCIM provisioning — auto-create / deprovision members from your IdP.
- Group sync — map IdP groups to cajeX roles (Entra ID natively; other IdPs via OIDC claims).
- Single Logout — sign out of cajeX when the user signs out of the IdP.
- Claims mapping — pin which IdP claim maps to which cajeX user attribute (email, display name, role).
How to use it
The Identity dashboard guides you through setup with a health check at every step. Common workflow:
- Pick the IdP type (Entra ID, generic OIDC, generic SAML).
- Follow the per-IdP setup card. Each card has a download/copy button for the configuration cajeX needs from your IdP and the configuration your IdP needs from cajeX.
- Run the Health check. It verifies every endpoint, certificate, and claim mapping.
- Enable JIT provisioning if you want users created on first SSO login (recommended).
- Enable SCIM if you want users explicitly synced from your IdP (recommended for compliance-driven orgs).
- Configure group mappings — which IdP groups become cajeX Admins, Reviewers, Members.
Tips
- Run the health check after every change. It catches subtle issues (expired certs, swapped claim names) before users hit them.
- Keep at least one local-account admin while you're configuring SSO. If your IdP config breaks, that account is your way back in.
- Group mappings are evaluated top-down. Put more specific mappings above broader ones.
Terminology (Admin only)
Admin → Terminology (formerly a Settings tab).
What it does
Workflow templates define the phases a Session walks through. cajeX ships with three:
- Governance Standard — full review (intake → AI review → human review → decision → sign-off).
- Agile Sprint — lighter, designed to fit in a sprint.
- Minimal Review — single phase, low-impact changes.
You can edit these or create your own.
How to use it
For each template:
- Phases — the ordered list of states the session moves through. Each phase has a name, a required role (e.g. only Reviewers can advance from "Decision"), and a checklist of gates to pass.
- Default participants — auto-add reviewers/observers when sessions are created.
- AI review hook — when (which phase) AI review runs automatically.
- Decision options — what outcomes are allowed (Approved / Approved with conditions / Rejected / Deferred).
Save the template. New sessions can pick from any active template; existing sessions keep their original template.
Tips
- Don't proliferate templates. Three to five is usually enough; ten makes it hard for facilitators to know which to pick.
- Mark templates Active or Archived rather than deleting — old sessions remember the template they ran on.
Automation (Admin only)
What it does
The Automation tab is where you wire cajeX up to the rest of your toolchain: webhooks, scheduled jobs, retry policies, and Calendar slot generation.
How to use it
- Webhooks — register a URL to receive events. cajeX fires nine event types (project submitted, finding raised, session completed, etc.) with HMAC signatures, retry-on-failure, and auto-disable after repeated failures.
- Scheduled jobs — cron-style configuration for recurring work (e.g. weekly KB → directive generation pass, monthly snapshot creation).
- Calendar slot generation — define recurring availability windows (e.g. "every Tue/Thu 14:00–16:00 UTC") that show up as bookable slots in the Calendar.
Tips
- Webhook signatures are HMAC-SHA256 over the raw body. Verify on your side; don't trust events that fail signature verification.
- If a webhook gets auto-disabled, the Failure log shows the last several response codes — usually enough to find the culprit.
Export (Admin)
What it does
Asynchronously dump your workspace's data — members, projects, findings, directives, KB entries — to a downloadable archive. Two main use cases:
- Backup / disaster preparedness — periodic snapshots into your own storage.
- GDPR / right-to-portability requests — give a member their record on demand.
How to use it
- Pick a scope: full workspace, or single user, or single project.
- Pick a format: JSON (today). CSV is on the roadmap.
- Click Run export. cajeX queues the job and emails you when it's ready.
- Download via the presigned link. The link expires after 24 hours.
Tips
- Schedule exports under Automation if you want them to run on a cadence.
- The presigned link is single-use-ish — anyone who has the link can download until it expires. Don't share in a public channel.
Features (visible to all)
What it does
A read-only view of which features are enabled for your workspace. Driven by your plan tier — see Billing for what each tier includes. Useful for answering "why can't I see X?" — usually the answer is "your plan doesn't include it."
If a feature is shown as Coming soon, the product team is actively building it. Locked means the feature exists but your plan doesn't include it; an upgrade unlocks it without re-onboarding.